angle_class_en.md 5.9 KB
Text Direction Classification
1. Method Introduction
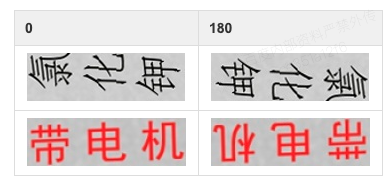
The angle classification is used in the scene where the image is not 0 degrees. In this scene, it is necessary to perform a correction operation on the text line detected in the picture. In the PaddleOCR system, The text line image obtained after text detection is sent to the recognition model after affine transformation. At this time, only a 0 and 180 degree angle classification of the text is required, so the built-in PaddleOCR text angle classifier only supports 0 and 180 degree classification. If you want to support more angles, you can modify the algorithm yourself to support.
Example of 0 and 180 degree data samples:
2. Data Preparation
Please organize the dataset as follows:
The default storage path for training data is PaddleOCR/train_data/cls, if you already have a dataset on your disk, just create a soft link to the dataset directory:
ln -sf <path/to/dataset> <path/to/paddle_ocr>/train_data/cls/dataset
please refer to the following to organize your data.
- Training set
First put the training images in the same folder (train_images), and use a txt file (cls_gt_train.txt) to store the image path and label.
- Note: by default, the image path and image label are split with
\t, if you use other methods to split, it will cause training error
0 and 180 indicate that the angle of the image is 0 degrees and 180 degrees, respectively.
" Image file name           Image annotation "

train/word_001.jpg   0
train/word_002.jpg   180
The final training set should have the following file structure:
|-train_data
    |-cls
        |- cls_gt_train.txt
        |- train
            |- word_001.png
            |- word_002.jpg
            |- word_003.jpg
            | ...
- Test set
Similar to the training set, the test set also needs to be provided a folder containing all images (test) and a cls_gt_test.txt. The structure of the test set is as follows:
|-train_data
    |-cls
        |- cls_gt_test.txt
        |- test
            |- word_001.jpg
            |- word_002.jpg
            |- word_003.jpg
            | ...
3. Training
Write the prepared txt file and image folder path into the configuration file under the Train/Eval.dataset.label_file_list and Train/Eval.dataset.data_dir fields, the absolute path of the image consists of the Train/Eval.dataset.data_dir field and the image name recorded in the txt file.
PaddleOCR provides training scripts, evaluation scripts, and prediction scripts.
Start training:
# Set PYTHONPATH path
export PYTHONPATH=$PYTHONPATH:.
# GPU training Support single card and multi-card training, specify the card number through --gpus.
# Start training, the following command has been written into the train.sh file, just modify the configuration file path in the file
python3 -m paddle.distributed.launch --gpus '0,1,2,3,4,5,6,7'  tools/train.py -c configs/cls/cls_mv3.yml
- Data Augmentation
PaddleOCR provides a variety of data augmentation methods. If you want to add disturbance during training, Please uncomment the RecAug and RandAugment fields under Train.dataset.transforms in the configuration file.
The default perturbation methods are: cvtColor, blur, jitter, Gauss noise, random crop, perspective, color reverse, RandAugment.
Except for RandAugment, each disturbance method is selected with a 50% probability during the training process. For specific code implementation, please refer to: rec_img_aug.py randaugment.py
- Training
PaddleOCR supports alternating training and evaluation. You can modify eval_batch_step in configs/cls/cls_mv3.yml to set the evaluation frequency. By default, it is evaluated every 1000 iter. The following content will be saved during training:
├── best_accuracy.pdopt # Optimizer parameters for the best model
├── best_accuracy.pdparams # Parameters of the best model
├── best_accuracy.states # Metric info and epochs of the best model
├── config.yml # Configuration file for this experiment
├── latest.pdopt # Optimizer parameters for the latest model
├── latest.pdparams # Parameters of the latest model
├── latest.states # Metric info and epochs of the latest model
└── train.log # Training log
If the evaluation set is large, the test will be time-consuming. It is recommended to reduce the number of evaluations, or evaluate after training.
Note that the configuration file for prediction/evaluation must be consistent with the training.
4. Evaluation
The evaluation dataset can be set by modifying the Eval.dataset.label_file_list field in the configs/cls/cls_mv3.yml file.
export CUDA_VISIBLE_DEVICES=0
# GPU evaluation, Global.checkpoints is the weight to be tested
python3 tools/eval.py -c configs/cls/cls_mv3.yml -o Global.checkpoints={path/to/weights}/best_accuracy
5. Prediction
- Training engine prediction
Using the model trained by paddleocr, you can quickly get prediction through the following script.
Use Global.infer_img to specify the path of the predicted picture or folder, and use Global.checkpoints to specify the weight:
# Predict English results
python3 tools/infer_cls.py -c configs/cls/cls_mv3.yml -o Global.pretrained_model={path/to/weights}/best_accuracy Global.load_static_weights=false Global.infer_img=doc/imgs_words_en/word_10.png
Input image:
Get the prediction result of the input image:
infer_img: doc/imgs_words_en/word_10.png
     result: ('0', 0.9999995)

